Note: The CRM2Print integration is currently available for Australian customers only. Imagine a world where, with the click of a button, all of your physical mail goes straight from your screen to the post box. No printing, folding, stamping or posting necessary.Impossible, you say? Not for Rex users. Rex has partnered with CRM2Print to drag you into the brave new techno-future - in all of its automated glory. This feature will conjure your paper mail out of thin air and deliver it without you even needing to lift a finger. (Well, almost. You still have to hit send - or Send via Mailing Service, to be exact.) This integration brings your office one step closer to achieving paperless status.
CRM2Print
CRM2Print is a fantastic service that saves you time, money and paper cuts by automating all the tedium that’s historically been part and parcel of the whole letter-sending business. Sending physical letters isn’t cheap - but it’s gotta be done.Let’s break it down.
- A single stamp - $1
- Envelope - 25c
- Paper - a few cents
- Printing - a few cents
- Time spent folding and stuffing - a few seconds per letter
- Time spent procrastinating about folding and stuffing said letter - potentially, a lifetime
CRM2Print will receive your templates and addresses, and then do all the hard work for you. They’ll print, fold, stuff, stamp and send all your physical mail to clients Australia wide. And they’ll do it all for about $1.40+GST - or around $1.30+GST if you process letters in bulk. (For more information and pricing details, check out their website.) Not to mention, they’ll get your letters in letterboxes much faster than your Admin team will... Sorry Donna, but you can’t beat a robot. Allow us to walk you through the process in 5 simple steps.
Step 1 - enable the integration
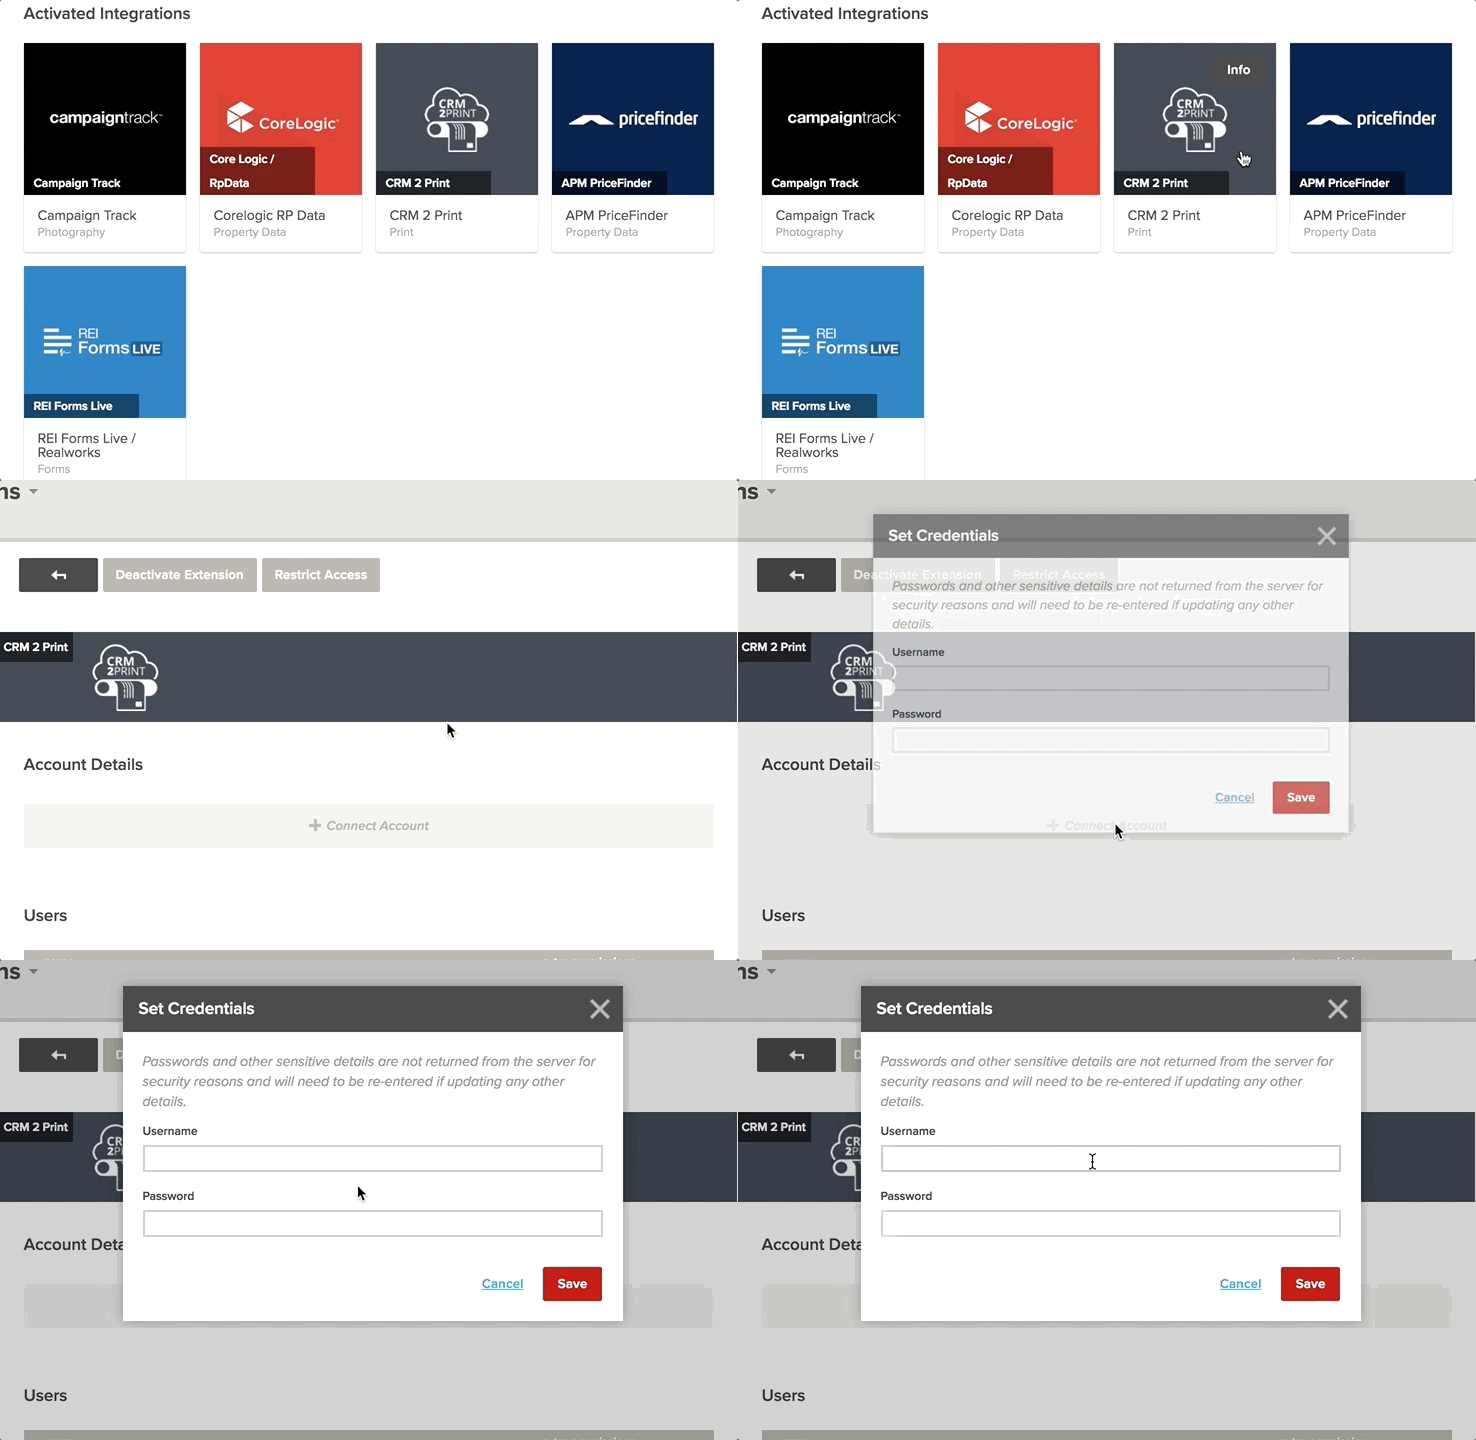
First thing’s first - you’ve got to sign up for CRM2Print and enable the integration. From the Dashboard, click Admin and then Integrations.Click on Discover, select the CRM2Print icon and click Activate. Then, from the Active tab, click the CRM2Print icon and enter your credentials.

What more can we say? It’s as easy as that.
Step 2 - add permissions for users
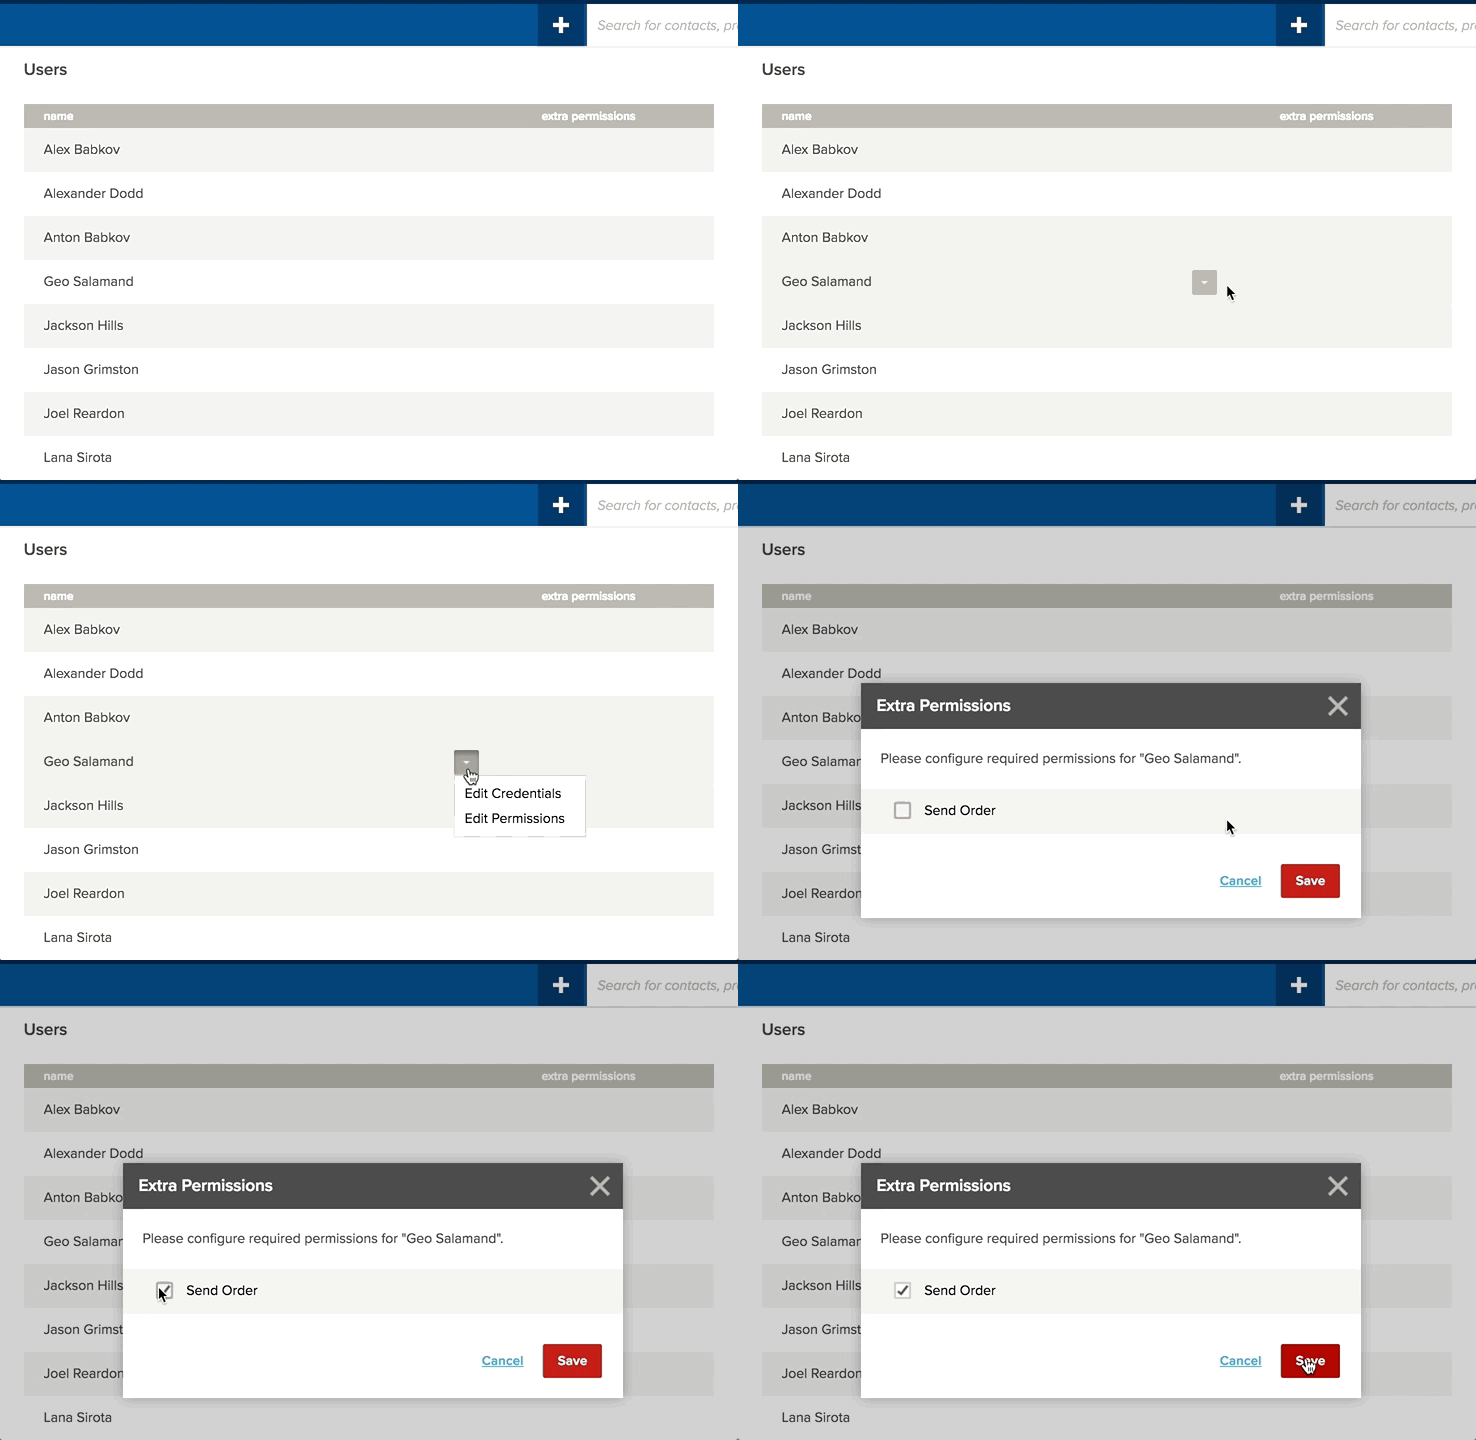
Before you get stuck in to letter writing, we need to talk about user permissions.All users are able to send draft letters to CRM2Print - but the order won’t be placed then and there. By default, after sending the draft to CRM2Print, someone will need to approve the order. We know that people can make mistakes and this (optional) extra step can help make sure you don't send hundreds of "thanks for listing" letters to your cold appraisals. Of course, if you want to give some of your staff the ability to send orders directly to CRM2Print without the approval step, you can do that too. From the CRM2Print page in Integrations, hover over the user you want to give access to. Click the dropdown button, choose Edit Permissions, tick Send Order and click Save.

Finally, if you don't want your agents (or certain agents) to be able to use the CRM2Print integration you can remove their access to this integration altogether.
Step 3 - write your letters
Once you’ve enabled CRM2Print, sending letters is comically simple.Select the contact(s) you want to send a letter to, and run a merge as usual. Choose a template - or write your letter on the fly. You can use this integration to send 1, 10 or 1,000 letters - prospecting collateral, transaction letters for solicitors and the rest. The possibilities are endless.
Step 4 - preview your letters
While we were developing this integration, we thought it would be nice for you to be able to preview your letters before you hit send. After all, it’s pretty important that your addresses appear in the window envelope. Otherwise, they’re not going to get very far - and then it’s all a rather pointless exercise, wouldn’t you say? Unless you have some sort of an inbuilt secretarial sixth sense, you probably don’t know the standard measurements for placing the address block so that it shows in the envelope window. So, to save you the frustration and wasted paper that comes with trial and error, we’ve given you the ability to check this before you hit send. Note that this functionality is available regardless of whether you have the CRM2Print integration enabled. You’ll find the option to “preview” available in each of the following locations:
- In Admin > Agency Settings & Branding > Agency Profile, where you define your agency’s default margins and letterhead.
- In Admin > Letter templates, when you create a template.
- In the single mail merge workflow
- In a mass merge:
- In step 1: When making template customisations or writing custom templates
- In step 2: When previewing merged text for single letters
- In step 2: When modifying the text for individual recipients
If you’ve turned the CRM2Print integration on, you’ll see an additional option when you click the “Preview” button - Preview for CRM2Print. Clicking this button will generate a preview of your letter - showing you exactly where the margins and window envelope are in relation to the text. Any issues, simply edit the letter or change the margins for the new template.
Step 5 - send to CRM2Print
Instead of downloading your merge as a PDF and printing, folding and fiddling about with it all yourself, click Send via mailing service.
This will generate a quote based on your CRM2Print subscription (as CRM2Print handles all charges, separate from your Rex subscription). You’ll also get the option to print duplex (double sided) or not which will reduce the cost of sending letters that include multiple pages per recipient. Finally, you have one of two options:
- Submit for Approval (this will be your only option if you haven't been granted order sending permissions)
- Send Order
If you hit Submit for Approval, your letters will - you guessed it - go to CRM2Print as a draft order (see step 6). If you hit Send order, you're done - the letter has been queued for printing, and mailing by CRM 2 Print.
Step 6 - approve your letters
This step is only required if you selected "Submit for Approval" in Step 5. From here, admin users will sign in to CRM2Print, approve the order and hey Presto! CRM2Print will pull your letters from cyberspace and send them off to their respective recipients via the Australia Post. How painless was that? We don’t need to go into too much detail about why this is a massive benefit for your agency. Stuffing envelopes has to be perhaps the most mind-numbing, paper-cutting, soul-crushing job in any office. Your admin team has much better things to be doing with their time. It’s a time-intensive and laborious process - so it’s nice to know you can move onwards and upwards into the next generation of innovative automation, and leave it in the past where it belongs.


